| Nakajima Trading Co., Ltd. Poly Woven Tape for Bag Making |
|||
| Top | How to make! | Color chart page | Instructions PDF |
 |
|||
| Instructions of Poly Woven Tape for Bag Making. (Vertical) English translated by Keiko Clark | |||
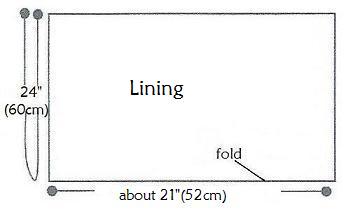
| Material list (All sizes include seam allowances) A: One roll of Poly woven tape, cut into 10 strips of 28"(70cm) for main body, and 2 strips of 16" (40cm) for facing. B: 21"(52cm) x 24"(60cm) for bag lining. *Depending on types of tape materials, Poly woven tape are semi-transparent.You could use this characteristic to show through the lining fabric or possible to make a bag without the lining. C: 1 pair of purse handle : INAZUMA Purse handles as you like. D: 1 pair of magnetic snap : INAZUMA AK-38-19, Size: 3/4" (18mm) |
*Use chalk or color pencil for making. Water erasable pen is not suitable. *Size 90/14 sewing machine needles are recommended. |
||
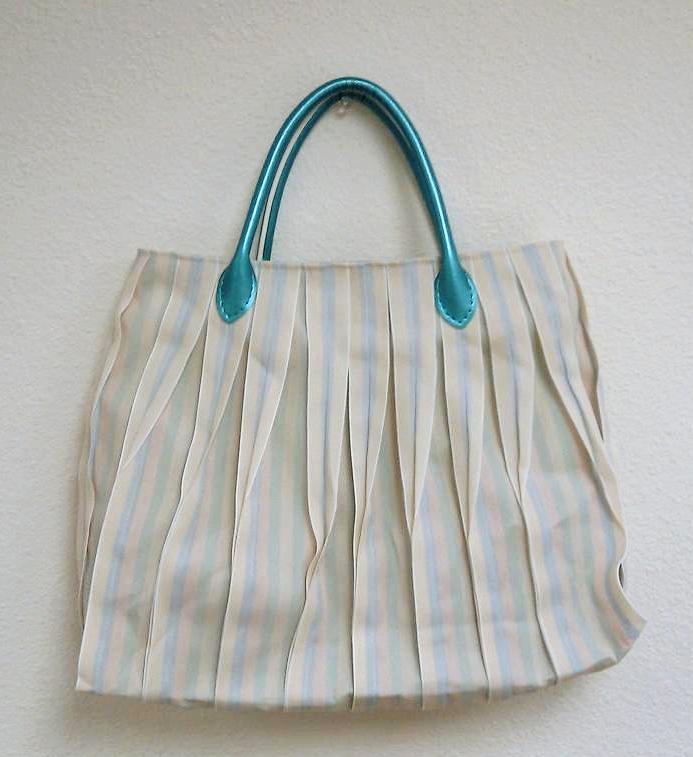 Finished size(without handles) 14"W x 10 3/4"H x 3 1/2"D (35cmW x 27cmH x 9cmD) |
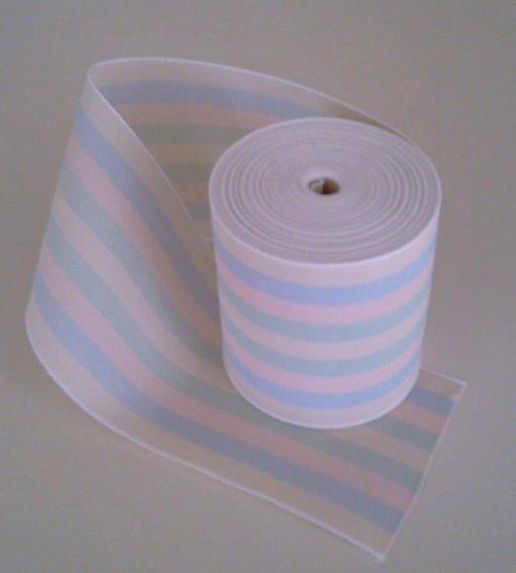 All tapes : 11 yards(10m)/roll Only THA(Lamé): 5.5 yards(5m)/roll |
 Rainbow purse Finished size(without handles) 14"W x 10 3/4"H x 3 1/2"D (35cmW x 27cmH x 9cmD) |
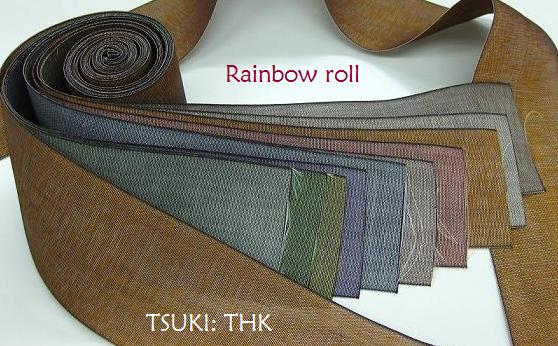 Rainbow Color Roll THK 10 colors |
| Note: Nakajima Poly woven tape is the product which was made to enjoy its original characteristic as it is used o Poly woven tape. Shrinkage, discoloration, fading might occur by heat, water, or direct sun light. DO NOT iron or wash this product!!! | |||
| 1: Cut ten 28"(70cm) strips for main body, two 16"(40cm) strips
for bag facing from Poly woven tape. *Always backstitch the beginning and the end of sewing. |
|||
 |
|||
 |
 |
||
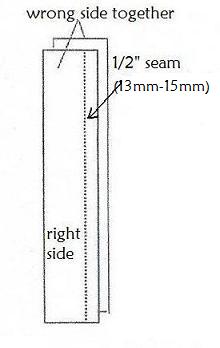
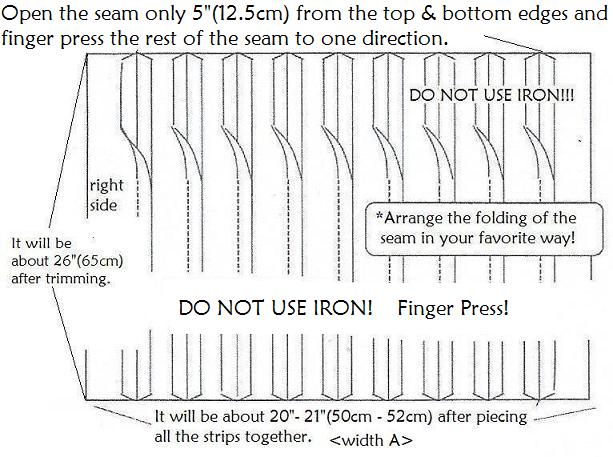
| 2: Place two 28"(70cm) Poly woven tape right sides together and sew them together at 1/2"(13mm) from the edges. Open the seam only 5"(12.5cm) from the top & bottom edges and finger press the rest of the seam to one direction. DO NOT USE IRON!!! Continue to sew all ten strips in a same manner. Cut the top and bottom edges off measure 26" (65cm) in length. Measure the width and note as <width A>. |
|||
 |
 |
||
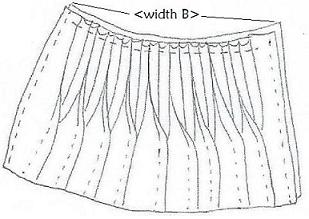
| 3: Make a small tuck between the seams of the strip so that the edges of the opened seam area will meet together. Repeat to make tucks in all the strips except for the first and the last strips. Stitch at 1/4"(7mm) from the edge to hold the tucks. Measure the width of tucked edge and note as <width B>. Fold in half wrong side together and sew 1/2"(13mm) from the side edges. Finger press open the side seam. Make triangle gusset (3 1/2"(9cm)) on the bottom corners. Fold 1/2"(13mm) the top openings towards wrong side and finger press. |
 |
||
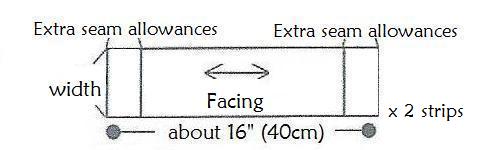
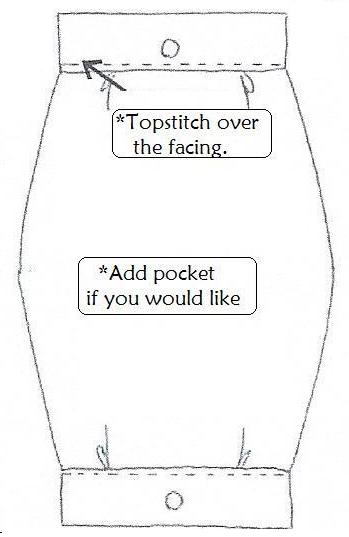
| 4: Cut two facing strips in the length of <width B>. Cut the lining fabric in the length 21"(52cm) x <width A>. Align the center and the both side edges of the facing strip and the lining width then fold the tucks in 2 places with the extra fabrics of the lining. Sew them together with 1/2"(13mm) seam and finger press towards facing. Topstitch over the facing. Repeat on the other side. |
 Click on the image to enlarge |
||
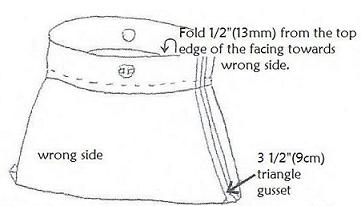
| 5: Fold the lining bag in half right sides together and sew both sides with 1/2"(13mm) seam. Open the seam and press. Make triangle gusset (3 1/2"(9cm))on the bottom corners. Fold 1/2"(13mm) from the top edge of the facing towards wrong side and press. Attach the magnetic button in the center of the facing. |
 |
||
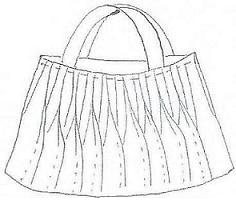
| 6: Insert the lining bag into the main bag. Place desirable handles between the layers and baste them. Align the edges of the openings and topstitch to complete! |
 |
||
| Copyright©2004-2012 EmmaCreation All right reserved. | |||